How to Organize Digital Assets: A Complete Guide for Creative Teams
Learn how to organize digital assets efficiently with tools, tips, and workflows tailored for creatives and marketers.
)
A well-organized system makes your files easy to locate, share, and use. However, without the right processes, creative workflows can become overwhelming and slow. This guide reveals how your team can simplify its workflows and boost productivity.
Quick Summary
This guide covers everything you need to know about organizing digital assets effectively. We break down what digital assets are, why organization matters, and two proven methods to keep your content tidy and accessible using a dedicated platform like Picflow. Check out the Picflow Blog for more insights into improving your creative workflows.
Want to Organize Your Digital Assets?
Creative teams often juggle lots of images, videos, PDFs, and design files, usually under tight deadlines. Without a proper system, things get lost, duplicated, or misused. Organizing your digital assets helps you do things faster, be more efficient, and stay in control of your content.
This Picflow guide will walk you through the best practices, tools, and workflows to help you store, tag, share, and manage your assets efficiently, so your team spends less time searching and more time creating.
Why Listen to Us?
At Picflow, we help creative professionals, marketers, and teams streamline the way they manage and deliver digital content. Our platform is designed around the real needs of people who work with high volumes of visual media, from drag-and-drop galleries to smart proofing tools and custom branding. We’ve seen firsthand how disorganized assets can slow down workflows, confuse teams, and damage client relationships. That’s why we built Picflow to make asset organization fast, intuitive, and scalable.
What are Digital Assets?
Digital assets are any files that carry value for your business or brand, whether that value is creative, operational, or strategic. These include visual files like images, videos, and design mockups; brand elements such as logos, fonts, and style guides; as well as functional content like slide decks, marketing PDFs, audio files, and motion graphics.
Essentially, if a file is used in your campaigns, presentations, social posts, advertisements, or client deliverables, it qualifies as a digital asset. These files represent your brand identity, communicate your message, and support your marketing and creative workflows.
What makes digital assets even more important is their reusability. A single video might be repurposed for YouTube, Instagram, and your homepage banner. A product photo could appear in an ad, a catalog, and an email campaign. Without a clear system for managing these files, it becomes easy to lose track of versions, formats, or usage rights.
That’s why proper digital asset organization is important. When your assets are well-categorized, clearly named, and stored in an accessible place, your team can work faster, stay on brand, and reduce the risk of duplicate effort or outdated content.
How to Organize Digital Assets: We Cover Two Methods
Method 1: Organize Digital Assets Using Picflow (Recommended)
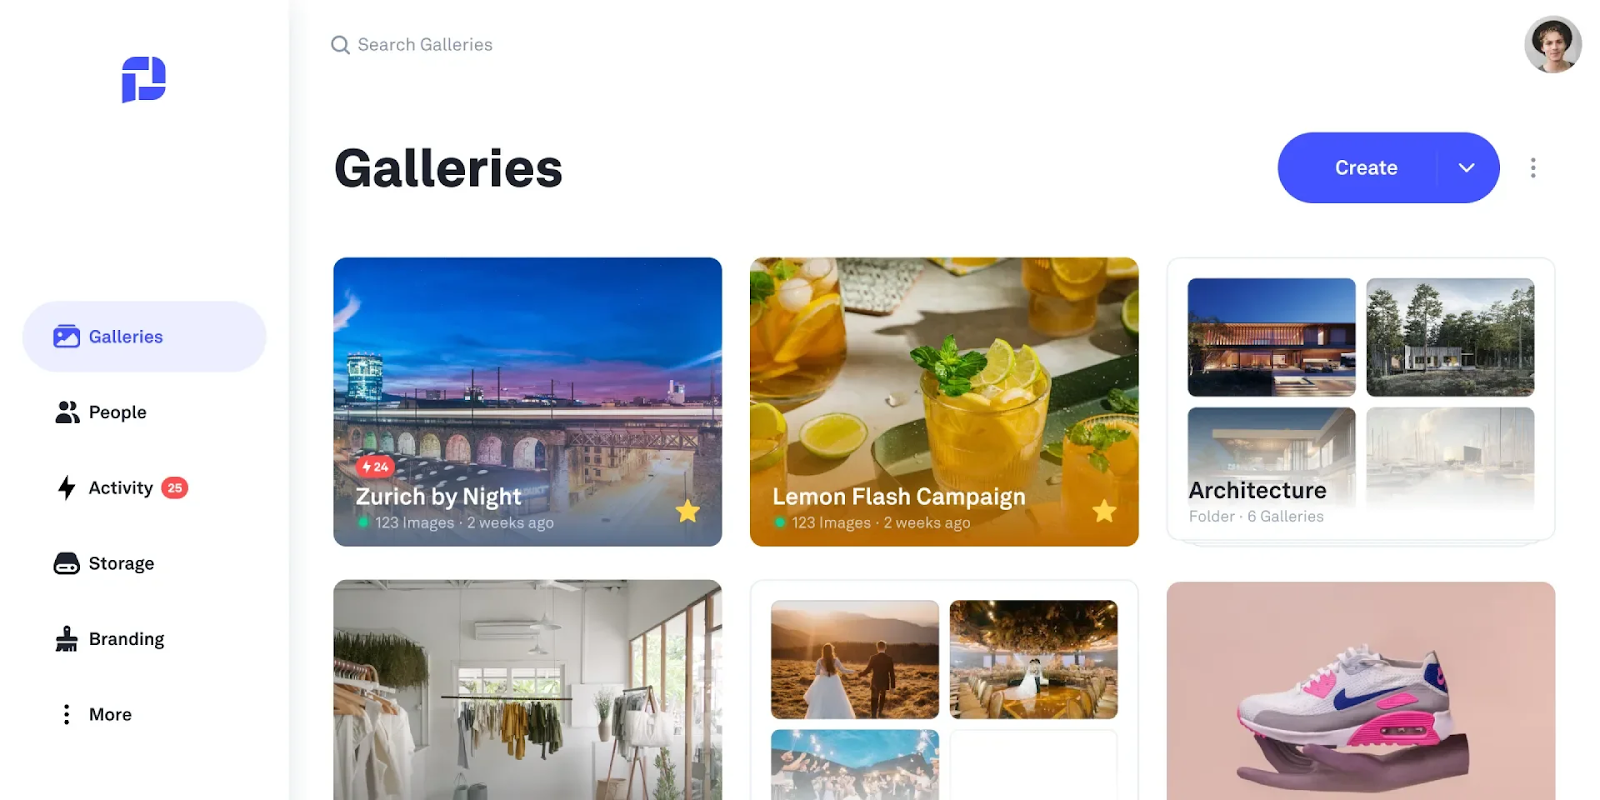
Step 1: Create a New Gallery
Log in to your Picflow account.
Click the “+ New Gallery” button.
Name your gallery to reflect the project, client, or asset type (e.g., “Summer Campaign 2025” or “Client X – Final Edits”).
Optionally, add a description for quick reference.
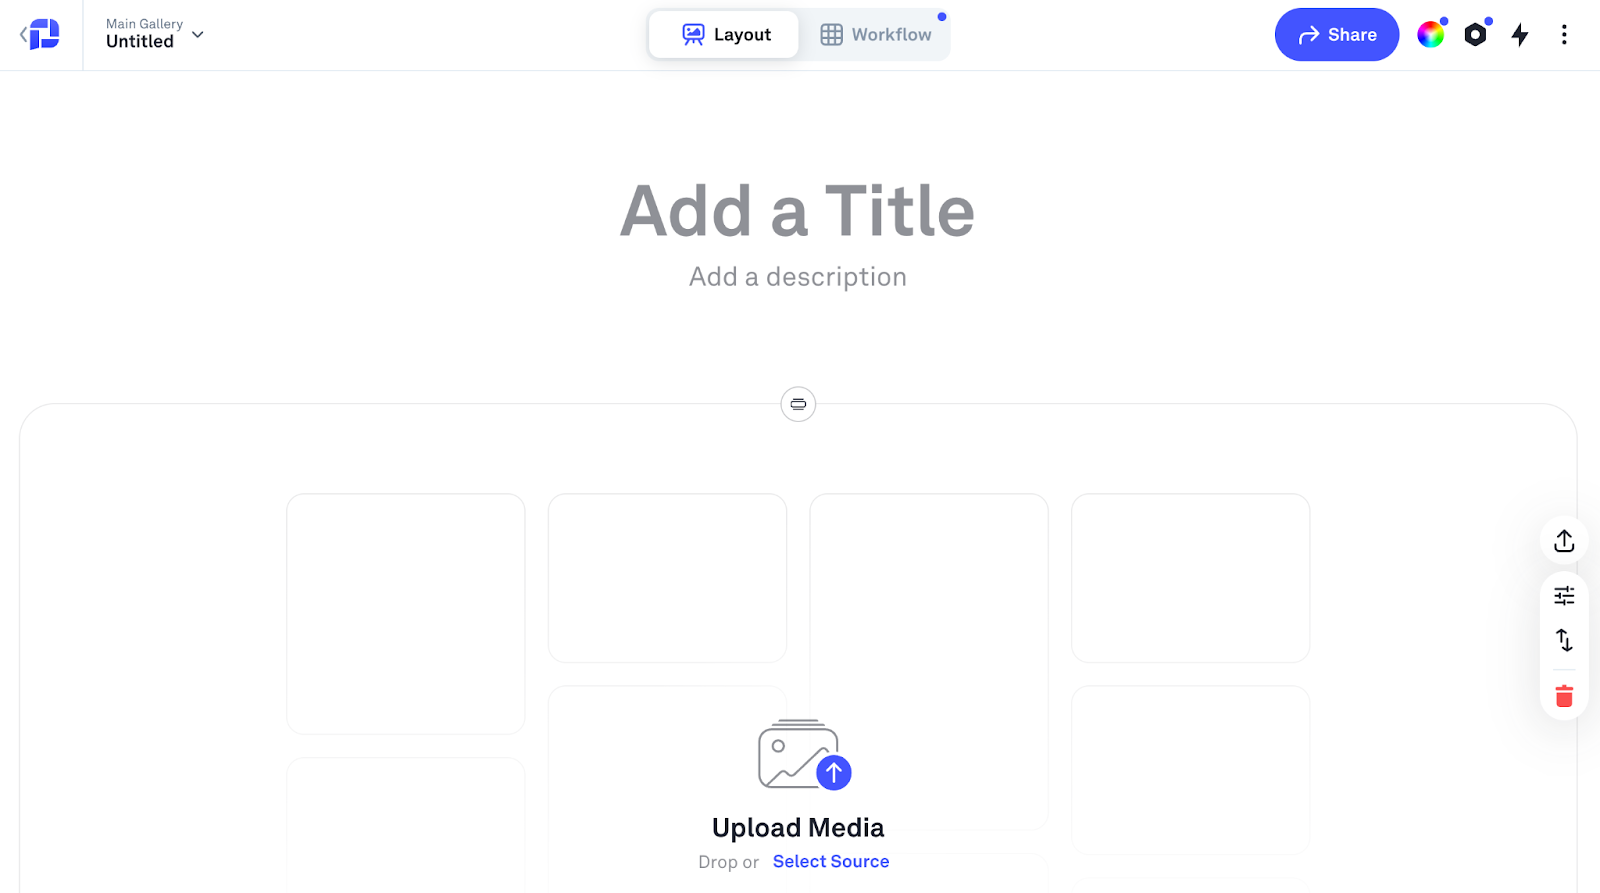
Step 2: Upload Your Digital Assets
Drag and drop your images, videos, or files directly into the gallery space.
Uploads begin instantly, no waiting or compression delays.
Organize your uploads into sections (e.g., “Approved,” “To Review,” “Reference”) if needed.
Step 3: Customize Your Gallery Layout
Open the Gallery Designer to adjust how assets are displayed.
Choose from layout options such as Grid, Mosaic, or Horizontal.
Apply branding: upload your logo, set custom colors, and define the font style.
Rearrange content manually or sort by filename, date, or custom order.
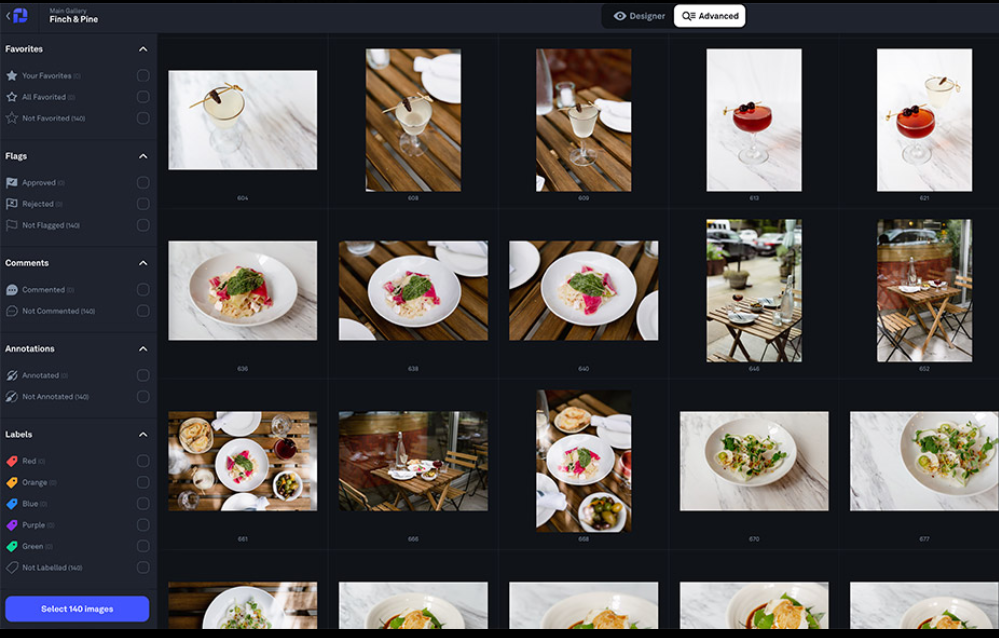
Step 4: Add Tags and Filters for Organization
Use tags or labels (e.g., “Portrait,” “Landscape,” “Social”) to group and filter assets.
Use color labels and flags to visually mark asset status (e.g., red for revisions, green for approved).
These tags make filtering easier in Workflow Mode.
Step 5: Enable Client Review Tools
Toggle on tools like Favorites, Comments, Annotations, or Flags.
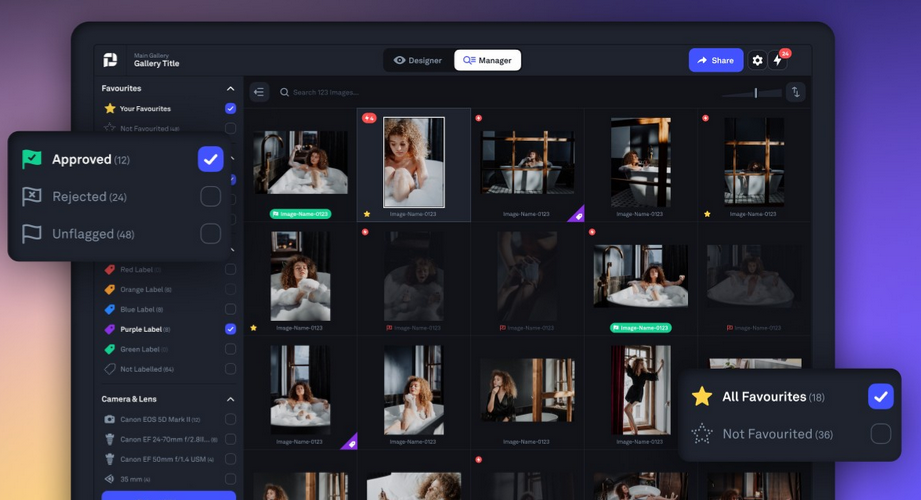
Choose only what you want clients to use to avoid clutter.
Enable notifications to be alerted when clients review or comment.
Step 6: Set Access Permissions
Create a Share Link.
Set permissions:
View only
Allow downloads
Require password
Enable or disable reviews
Track who viewed, downloaded, or interacted with each asset.
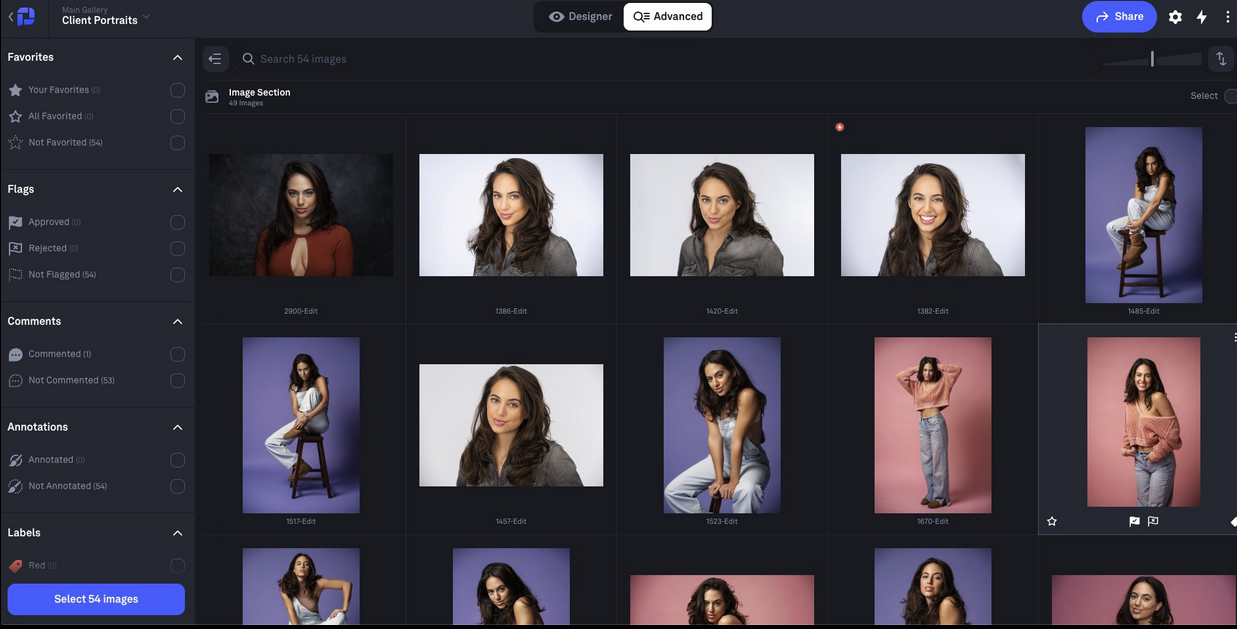
Step 7: Use Workflow Mode for Asset Management
Switch to Workflow Mode for advanced sorting and filtering.
Apply filters (e.g., show only “Flagged” or “Needs Review” items).
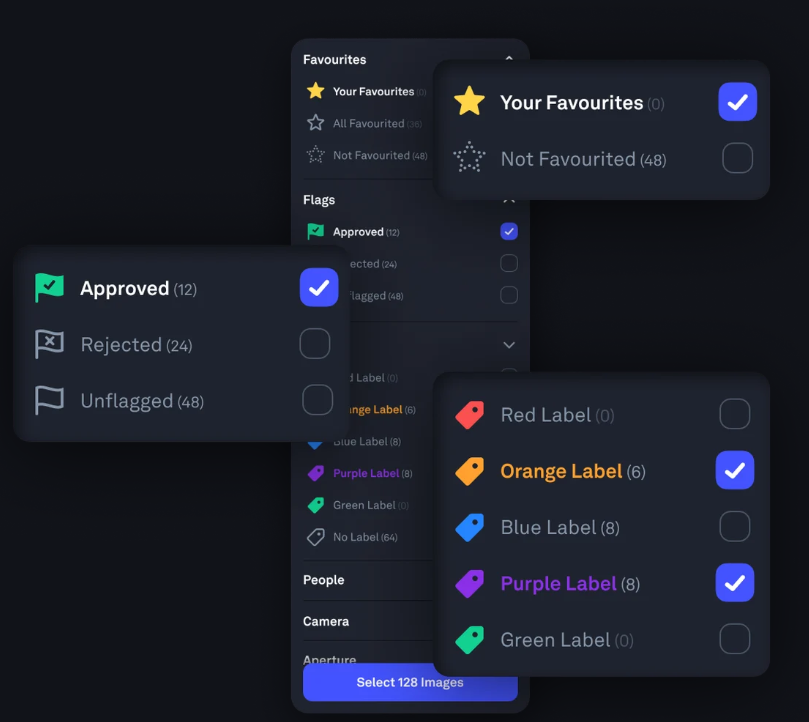
Use bulk actions to label, move, or delete multiple assets at once.
Export filenames or selections for documentation or editing lists.
Step 8: Keep Galleries Updated
Add new files or revised versions as needed.
Replace images while maintaining existing comments or tags.
Notify clients or teammates of updates using the share link or built-in notifications.
Method 2: Organize Digital Assets Manually with Folder Structures and Naming Conventions
An alternative method to organize your digital assets is to do it manually. While it may lack the automation and collaboration features of a digital asset management system, a well-planned folder structure combined with consistent naming conventions can go a long way in keeping your files clear, searchable, and accessible.
Here’s how to do it:
Step 1: Create a Clear Folder Hierarchy
Start by designing a folder system that reflects your workflow. Your structure should be intuitive enough that anyone on your team can find what they need without asking.
Example structures:
By Project: Clients > Client Name > 2025 Summer Campaign > Final Assets
By Asset Type: Assets > Logos > Color Versions > Horizontal
By Date: 2024 > Q3 > Campaign_X > Social Media
Use folders and subfolders to break your content down by category, type, or timeframe. Try not to go more than 3–4 levels deep, deep hierarchies often become hard to navigate.
Step 2: Apply Consistent File Naming Conventions
Good naming conventions will save you lots of time, especially if you’re not using a search-indexed system. Each file name should include enough context to be understood outside of its folder.
Example: Client_SummerCampaign_Instagram_1080x1080_V1.jpg
Best practices:
Use underscores or hyphens instead of spaces.
Include project name, asset type, and version number.
Avoid vague terms like “final” or “new” without a date or version. This ensures assets are correctly sorted and recognizable across platforms.
Step 3: Use Metadata (When Possible)
Many file types (like photos, PDFs, and design files) allow embedded metadata. Adding details such as creator, usage rights, keywords, and dates helps maintain control over your content, especially in large libraries.
Tips:
Use tools like Adobe Bridge, Lightroom, or macOS Finder to edit metadata.
Add keywords for content type, subject, or client.
This added layer of information improves discoverability, especially in shared drives.
Step 4: Standardize File Formats
Avoid clutter and compatibility issues by choosing standard formats for each type of asset:
Photos: JPG or PNG for delivery, RAW for archive.
Designs: PDF for review, AI/PSD for working files.
Videos: MP4 or MOV in finalized formats.
Store original files in a designated “Source” folder, and create separate folders for “Exports” or “Client-Ready” versions.
Step 5: Archive and Backup Regularly
To keep your library manageable, implement a system for archiving inactive projects:
Move completed work to an Archive folder.
Use external drives or cloud services for long-term storage.
Also, set up automated backups (via Google Drive, Dropbox, or Time Machine) to protect against accidental loss.
Step 6: Share with Structure
If you need to deliver files to clients or teammates:
Compress folders into clearly labeled ZIP files.
Include a simple README or folder map if the structure is complex.
Double-check file names and remove unnecessary drafts or duplicates.
A clean, well-named package shows professionalism and reduces confusion on the recipient’s end.
Manual organization takes discipline, but it works, especially for solo creatives or small teams. When structured well, even a basic folder setup can reduce search time, prevent duplicate work, and make your file library feel far more manageable.
If you find your system growing beyond what folders can handle, that’s a good sign that it’s time to transition to a dedicated tool like Picflow.
Best Practices for Organizing Digital Assets
Use Clear, Consistent Naming: Adopt a naming convention that includes project name, asset type, and version number. This ensures everyone can identify and search for files quickly.
Create an Intuitive Folder Structure: Organize files by project, client, or asset type. Keep the hierarchy shallow, no more than 3–4 levels deep, to avoid confusion and reduce time spent navigating.
Tag and Label Strategically: Use tags or visual labels (e.g., “Approved,” “To Review”) to group content by status, format, or usage. This makes filtering and searching more efficient.
Separate Working and Final Files: Keep editable files (like PSDs or RAWs) in a separate space from final exports. This prevents accidental edits and keeps delivery-ready content easy to access.
Review and Archive Regularly: Remove duplicates, archive completed work, and update outdated content on a regular schedule. This keeps your library lean and your team focused on current assets.
Picflow Makes Organizing Digital Assets Simple and Visual
Keeping your digital assets organized doesn’t have to be time-consuming or complex. With the right system like Picflow, you can save hours of searching, improve collaboration, and ensure your content is always on-brand and ready to share.
Picflow is built specifically for creatives, marketers, and visual teams who need more than just storage. From customizable galleries and fast uploads to smart review tools and permission controls, Picflow makes it easy to organize, deliver, and manage digital content without sacrificing aesthetics or speed.
Try Picflow free and experience a smarter, more streamlined way to keep your creative work in order.