Video Production Workflow: Our Ultimate How-To Guide
Explore the comprehensive how-to guide on video production workflows, covering essential steps, tools, and tips for seamless video creation. Elevate your video projects with expert insights and recommendations.
)
Helpful Summary
Overview: We've crafted a comprehensive guide to simplify the video production workflow for beginners.
Why trust us: We’ve helped thousands of creative professionals streamline their creative workflows with tools for client gallery creation, reviews, approvals, and more.
Why this is important: A streamlined video production workflow saves time, enhances quality, minimizes errors, and improves collaboration.
Action points: Break your workflow into distinct stages and optimize each stage with the advice and tools covered below.
Further research: Check out the Picflow Blog for more guides and recommendations.
Wondering How to Optimize Your Video Production Workflow?
You're an aspiring video producer ready for your first project. However, the video production process can feel overwhelming for beginners, especially regarding storyboarding, shooting, editing, and publishing.
Where do you even start? Don't sweat it.
We've put together the ultimate guide to walk you through the video production workflow from start to finish. With step-by-step instructions, pro tips, and beginner-friendly tools, you'll be shooting and editing like a pro in no time.
In this Picflow article, we’ll show you the ropes of professional video production and create videos you're proud to share.
Why Trust Us?
At Picflow, we are committed to giving creatives the tools they need to succeed. From stunning client galleries to powerful, workflow-enhancing tools, we’re always looking for ways to make video production more efficient and enjoyable.
What are the Stages of a Video Production Workflow?
The video production workflow refers to the entire video creation process, from conception to completion.
It involves several stages:
Pre-Production: This first stage is all about planning and preparation. You'll determine the video's purpose and audience, create a script or storyboard, scout locations, and plan the shooting schedule. Working out all the details here is critical to execute smoothly during production.
Production: Now it's time to shoot your video footage. This is where you bring your ideas to life with lights, camera, and action. During this stage, it's essential to clearly understand your script or storyboard and communicate effectively with your team.
Post-Production: Here's where the magic happens. Import your footage and review it all, selecting the best clips. Then, edit it together into a rough cut. Refine the edit, add transitions, graphics, special effects, color correction, and a soundtrack.
Distribution: Once your video is ready, it's time to share it with the world. Upload it to platforms like YouTube, Vimeo, or your company's website. Share it on social media and with your target audience. Make sure to also optimize the title, description, and tags for SEO purposes.
Why Should You Optimize Your Video Production Workflow?
Save Time and Increase Efficiency
A standardized video production workflow will save you tons of time and make the entire process much more efficient. When everyone on your team knows the necessary steps and timeline, there's no confusion or scrambling to figure things out. You can focus on being creative instead of managing logistics.
Higher Quality Results
A polished workflow results in higher-quality videos. You can give adequate attention to each production stage when you have a systematic process. Things like lighting, audio, scripting, and editing are carefully crafted. Your viewers will notice the difference.
Fewer Costly Mistakes
Following a proven workflow minimizes mistakes that could cost you time and money. For example, you could lose valuable footage if you forget to charge camera batteries or clear memory cards before a shoot. A good workflow checklist helps ensure all prep work is done properly before production day.
How to Create a Streamlined Video Production Workflow
1. Start with a Thorough Creative Brief
A creative brief is a document that describes your entire project (in broad strokes). It’s very important to create one, because details like your video’s message, target audience, and calls to action will influence every other aspect of production.
A great creative brief includes:
Goal(s): This is a pretty broad description of the project that answers a few questions…
What are you trying to achieve with the video?
Does this feed into any larger organizational goals?
How will the video do this?
What is the message or narrative?
Budget: How much are you able to spend on this project? This is your upper limit.
Timeline: When do you need the video to be completed by?
Audience: Who is your target audience for the video?
Roles: Who is responsible for doing what?
Stakeholders: Who plays a more passive role in the project (e.g., reviewers, legal, etc.)?
Take your time at this stage—it can be hard to make large pivots once a project is underway. If you’re working with clients, thorough intake forms will help you speed the briefing process up by collecting all necessary information upfront.
2. Create a Storyboard or Outline
Next on the agenda is creating a storyboard or outline of the project.
This is just a rough, visual representation of the narrative or flow of the video. It can include sketches, images, and descriptions of scenes or shots—anything that gives stakeholders a good idea of what to expect.
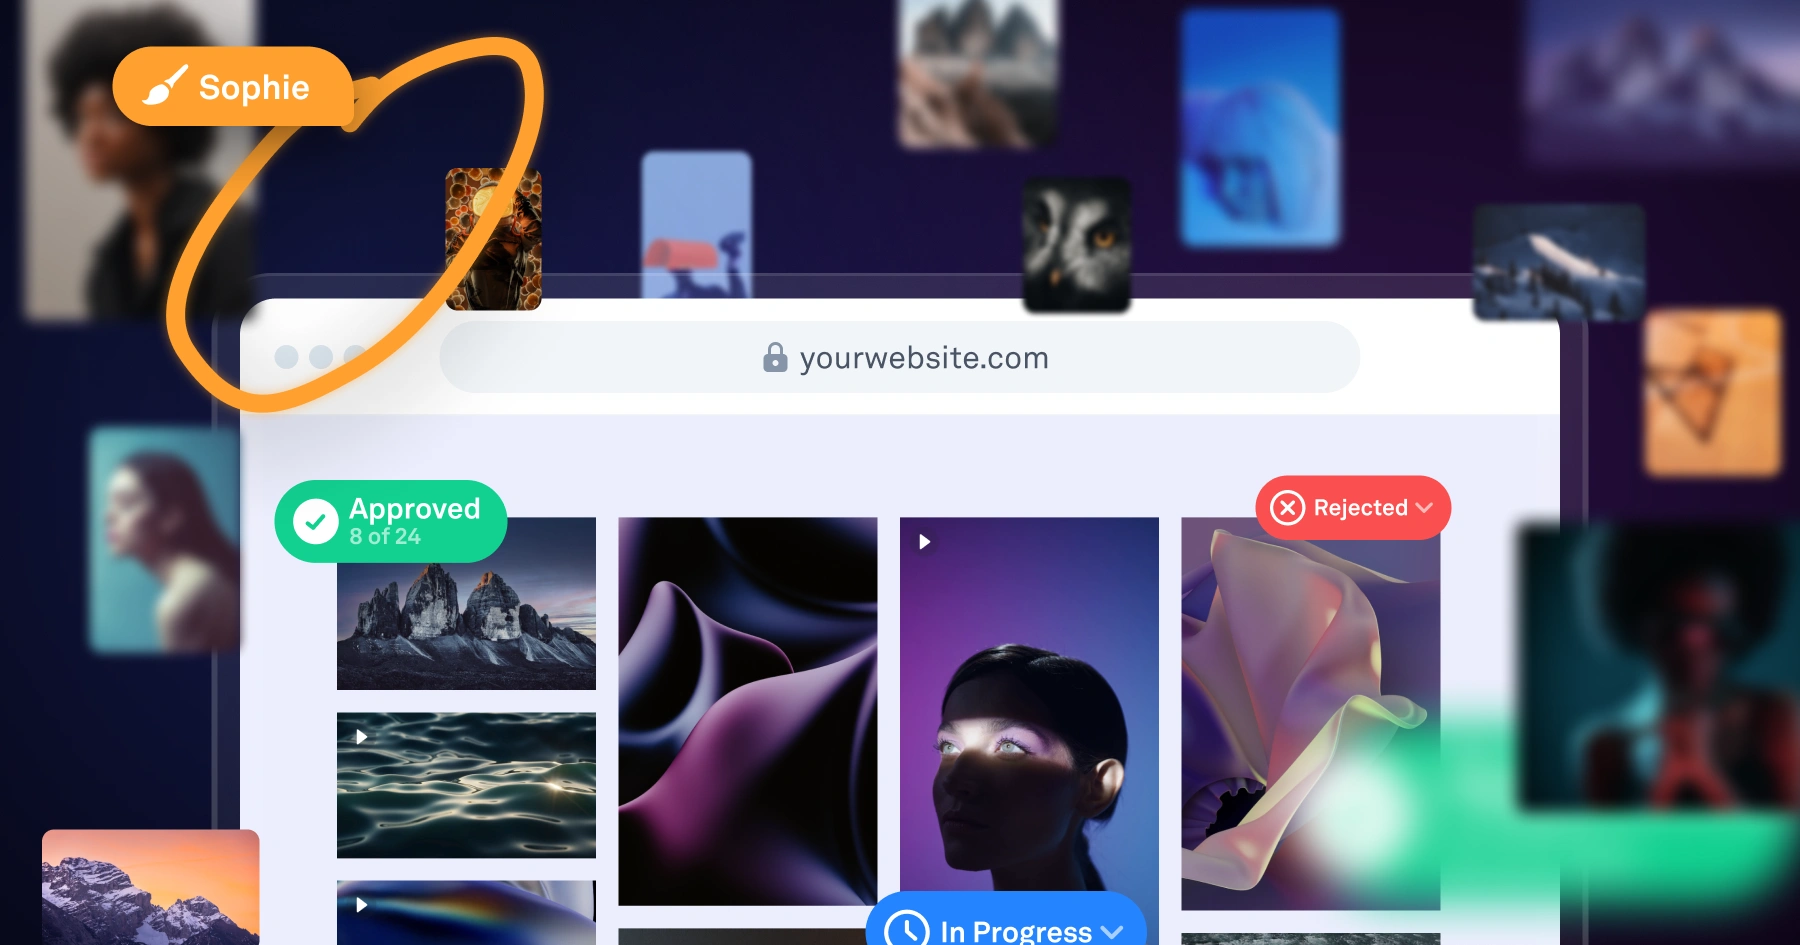
 This will probably involve quite a bit of back-and-forth. We recommend creating a shareable gallery with Picflow and giving reviewers and approvers access to simplify things. This allows them to offer feedback and make suggestions with features like:
Comment threads
Shortlists and tags
This makes things easier since feedback is attached directly to the image.
It also streamlines the approval process and ensures everyone is on the same page before moving forward with production. Once you have a solid storyboard or outline, you can also create a rough script, although this tends to be more flexible than the storyboard.
3. Finalize Equipment, Shot List & Budget
Once you have an approved storyboard and script, your planning can become more detail-oriented.
Start by reviewing the storyboard and figuring out exactly what equipment (cameras, lenses, lighting, etc.) you will need for each shot. You can also estimate the number of professionals (actors, animators, etc.) needed for each scene.
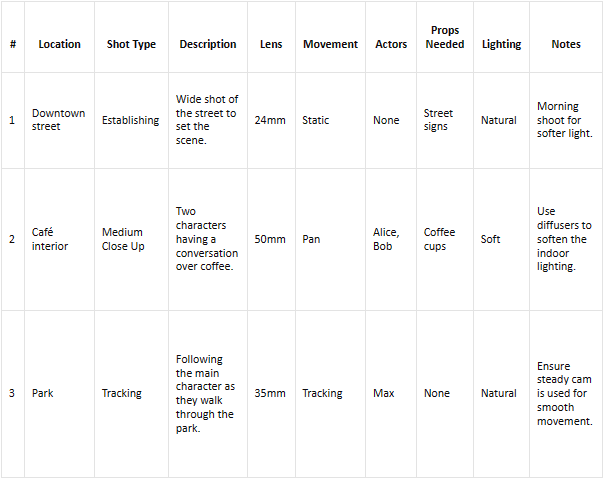
Next, make a detailed shot list that includes the specifics of each shot, such as camera angle, movement, and any special effects or props. The descriptions can be quick, but they need to convey details well—like this:
 Once your equipment and shot list are finalized, you can create a budget based on these requirements. Hopefully, this number is lower than the upper limit in your creative brief—if it isn’t, it’s back to the drawing board.
4. Create a Production Schedule
Another plan? I know, it probably seems like overkill. But trust me, having a clear production schedule will save you time and headaches in the long run.
A production schedule is basically a timeline that outlines all the tasks needed to complete your shot list and bring your video to life. It should include specific dates, times, and locations for each shoot day as well as any important deadlines or milestones.
Start by breaking down your shot list into manageable chunks. For example, if you have 35 shots to capture, you may want to schedule 7 shots per day over the course of 5 days. This will give you some flexibility in case of unforeseen circumstances.
5. Do an Equipment Check
It's important to do an equipment check on the day of the shoot (and each day of a multi-day shoot).
This means checking that all the equipment needed for your shot list for the day is on-set, in working order, and within easy reach. It’s also a good idea to have backup equipment on hand in case anything malfunctions.
Our recommendation?
Add stickers with numbers that correspond to your shot list onto each piece of equipment. This will help you keep track of what's in use, what's being charged, and what needs to be returned at the end of the day.
6. Film
If you’ve been thorough about your planning up to this point, filming should go smoothly. That’s the beauty of having a clearly defined, logical video production workflow! Work through your shot list (while trying your best to stick to your production schedule).
7. Editing, Review & Final Approval
The final stage of this process is editing, reviewing, and final approval. This is where you take all the footage that you have captured and put it together into the final video product.
Here’s a rundown of this stage of the workflow:
Editing
In terms of equipment needed for editing, a computer with editing software will be necessary. You can use free programs like iMovie or Windows Movie Maker or invest in more professional software like Adobe Premiere Pro or Final Cut Pro.
Editing involves piecing together your footage in a cohesive and visually appealing way. This is also when any additional audio or visual elements can be added, like:
Music
Graphics
Voiceovers
B-roll
Don't have these assets ready to go? An all-in-one creative toolkit like Envato covers royalty-free music, sound effects, motion graphics, ready-made video templates, and stock B-roll in one place — and its AI tools can generate custom footage, voiceovers, and graphics when a project needs something specific.
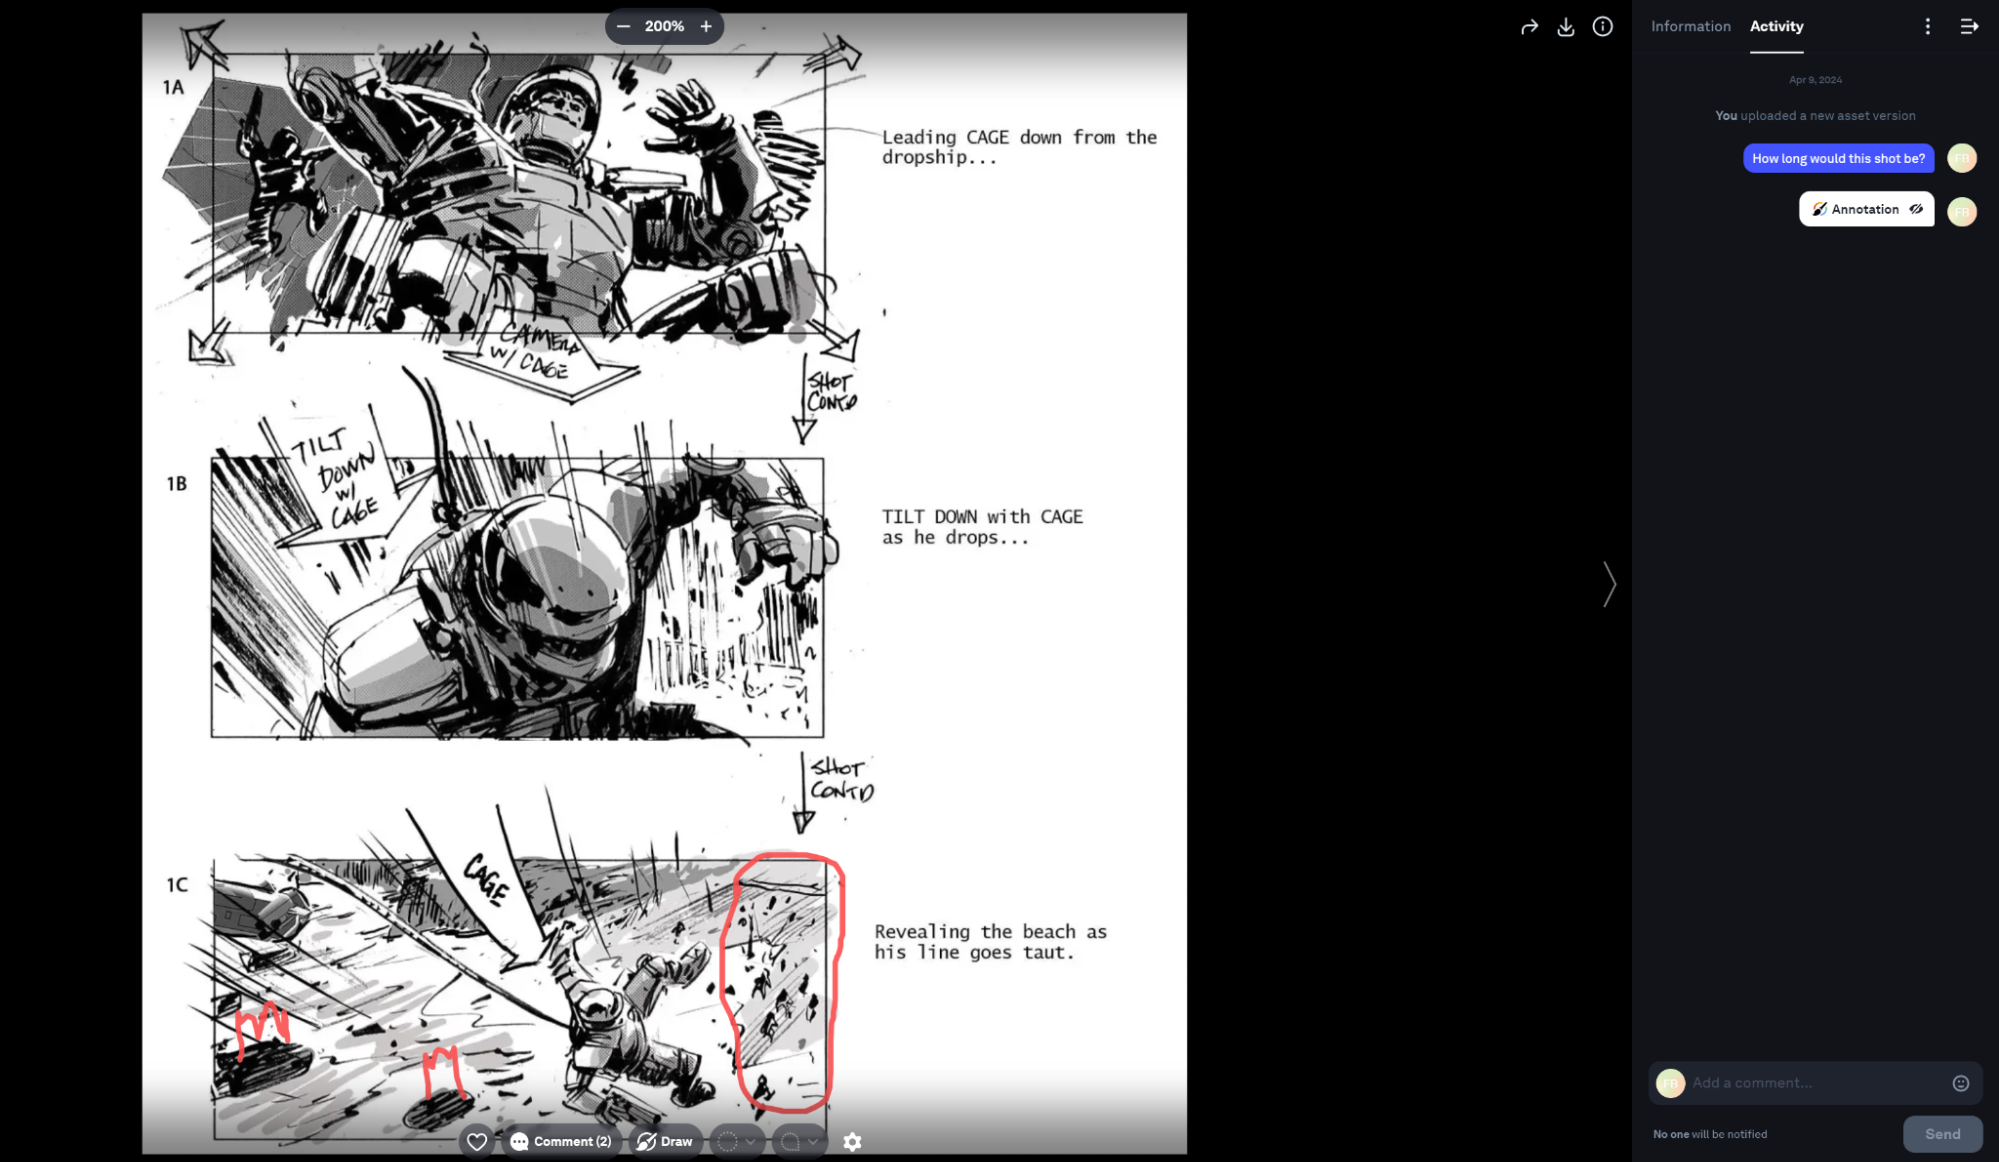
Review
Throughout the editing process, there should be regular reviews with stakeholders and/or project leads to access progress and correct course if necessary.
Picflow is a valuable tool here.
You can easily create galleries for your team to view and give feedback on specific parts of the video with features like:
Version comparisons
Video feedback (annotations and comments)
Tags and lists
We also offer a workflow mode that gives you powerful features like keyboard shortcuts, bulk actions, and more.
Final Approval
The last step? Final approval.
This is when the project team, stakeholders, and any other necessary parties review the final version of the video and give their stamp of approval. If you’re working with clients, this is as simple as sharing the link to your Picflow gallery and waiting for any final comments.
Once approved, you can easily export your video in various formats to fit your needs. And voila! Your video is ready to be shared with the world.
Conclusion
So there you have it—a complete walkthrough of the full video production workflow from start to finish. By following the steps we've outlined here, you'll be well on your way to creating professional, polished videos with high production value.
Video production can initially seem daunting, but it can be a really enjoyable and rewarding experience with the right planning and preparation. The more videos you produce, the more comfortable the process will become.
Looking for a tool to support and simplify your video production workflow? Try Picflow for free and see how it can streamline your process.