How to Structure an Effective Creative Workflow (10 Steps)
Curious about the best way to approach your creative projects? Many creative professionals and teams are. In this guide, we peel back the layers to reveal a proven, effective creative workflow that will help you and your team produce top-notch work, on time, every time.
)
Helpful Summary
Overview: We detail the importance of a creative workflow for any project, and explain how you can structure your own effective creative workflow in just ten steps.
Why you can trust us: We’ve helped more than 10,000 businesses and individuals improve their creative process, and we’ve used our expertise to create a tried-and-true workflow.
Why this is important: A structured creative workflow prevents missed deadlines and confusion within teams.
Action points: Begin by clarifying your project scope to establish a foundational plan, then use tools to streamline your process and stay organized.
Further research: Check out the Picflow Blog for more tips and insights on optimizing your creative workflow.
Wondering How to Structure Your Creative Workflow?
…lots of creatives do. After all, building workflows and processes isn’t exactly part of the job description for most creative roles and positions.
That said, it is an unavoidable part of the job. Without a clear and well-defined workflow, creatives often struggle to meet deadlines and feel overwhelmed by the chaos of their projects.
We’re trying to help you avoid that scenario with this Picflow guide.
Join us as we dive into the key steps you need to take to establish a solid foundation for your creative workflow, plus some handy tools and tips to keep everything running smoothly.
Why Trust Us?
Building an effective creative workflow can be tough.
Many face challenges like managing large shoots and efficiently getting client approvals. At Picflow, we've directly addressed these issues. Our users have used our platform to simplify these (and many other) processes, and we want to share our knowledge with you.
What Is a Creative Workflow?
A creative workflow is the local sequence of tasks and processes that a creative professional or team uses to bring an idea from conception to completion. It includes ideation, planning, creation, review, revisions, and delivery.
In other words, it’s how you work as a creative professional or team. And it makes a huge difference in the quality and efficiency of your work (more on why in a bit).
Why Does Your Creative Workflow Matter?
Creativity and order seem like polar opposites.
But creative professionals and agencies aren’t just artists creating in a vacuum—they’re businesses with commitments to uphold, deadlines to meet, and expectations to exceed. To do all that reliably (while finding the time to be creative), you need to have a clear, efficient workflow in place.
With a structured creative workflow, you can:
Prioritize project bandwidth and revisions.
Collaborate effectively with team members, clients, and stakeholders.
Maintain a consistent brand image across all projects.
Avoid confusion and miscommunication.
Ensure timely delivery of projects.
Improve overall efficiency and productivity.
Want to learn how to unlock all these benefits with a well-thought-out workflow? Read on.
How to Structure an Effective Creative Workflow (10 Steps)
1. Set Expectations Early
As every creative knows, there’s no bigger source of stress than unclear expectations. It’s a recipe for disappointed clients and stakeholders, last-minute project changes, awkward conversations, and lost time—all of which you want to avoid.
How? By putting in upfront work to establish expectations and guidelines for the project.
Here’s how to do this:
Start with an intake form or questionnaire. Whenever someone asks for creative work (be it a client, a boss, or a colleague), have them fill out an intake form or questionnaire. This will help you understand what they want to get out of the project, their goals and objectives, their timeline and budget, and any preferences or constraints they may have.
Have a kickoff meeting. Once you’ve received the intake form/questionnaire, schedule a kickoff meeting with all stakeholders involved in the project. Review the information provided and clarify any questions or concerns. Then clearly state which of their requests you can fulfill, which you can’t, and what extras are included (revisions, meetings, etc.).
Follow up with a written brief. After the kickoff meeting, send out a written brief outlining all the details and agreements discussed. Use bullet points to make deliverables and deadlines clear, and make sure everyone involved has a copy for reference.
By the time you’re done with this three-step process, the scope of the project should be clear. If issues do come up, you have an irrefutable paper trail to refer to.
2. Create a Creative Brief
Didn’t we already create a brief? Yes, but that was a kickoff brief to get everyone on the same page.
Now it’s time to create a creative brief—a more detailed document that will guide the actual work being done. This is an internal document, so what you include is entirely up to you, but we can offer some suggestions.
Here are some items that are probably worth covering:
Project overview (summary, goal, deadline, etc.)
Target audience and key messaging
Brand guidelines
Design guidelines (colors, fonts, imagery)
Deliverables and specifications
Budget constraints
Milestones
Contact information and notes
Once you’ve created the brief, you should distribute it to every team member that’s involved in the project.
Step 3: Delegate Roles and Responsibilities
Speaking of team members…
The next step is to delegate the workload to your team (if you have one—feel free to skip this step if you’re working solo). That means capacity planning, or figuring out how much work each person can realistically take on, and assigning enough people to complete tasks within the deadline.
Here’s a simple guide to help you with this:
List all the tasks that need to be completed (in the order they need to be done).
Estimate the amount of time each task will take (using past project data if possible).
Work out how much time each team member has available to work on the project.
Divide up the tasks based on time and skill level.
Leave buffer time for unexpected delays or issues.
Once you have your plan, make sure you communicate it clearly to all involved. It helps to set up a project management tool like Asana, ClickUp, or monday.com to keep track of tasks, deadlines, assignments, and dependencies.
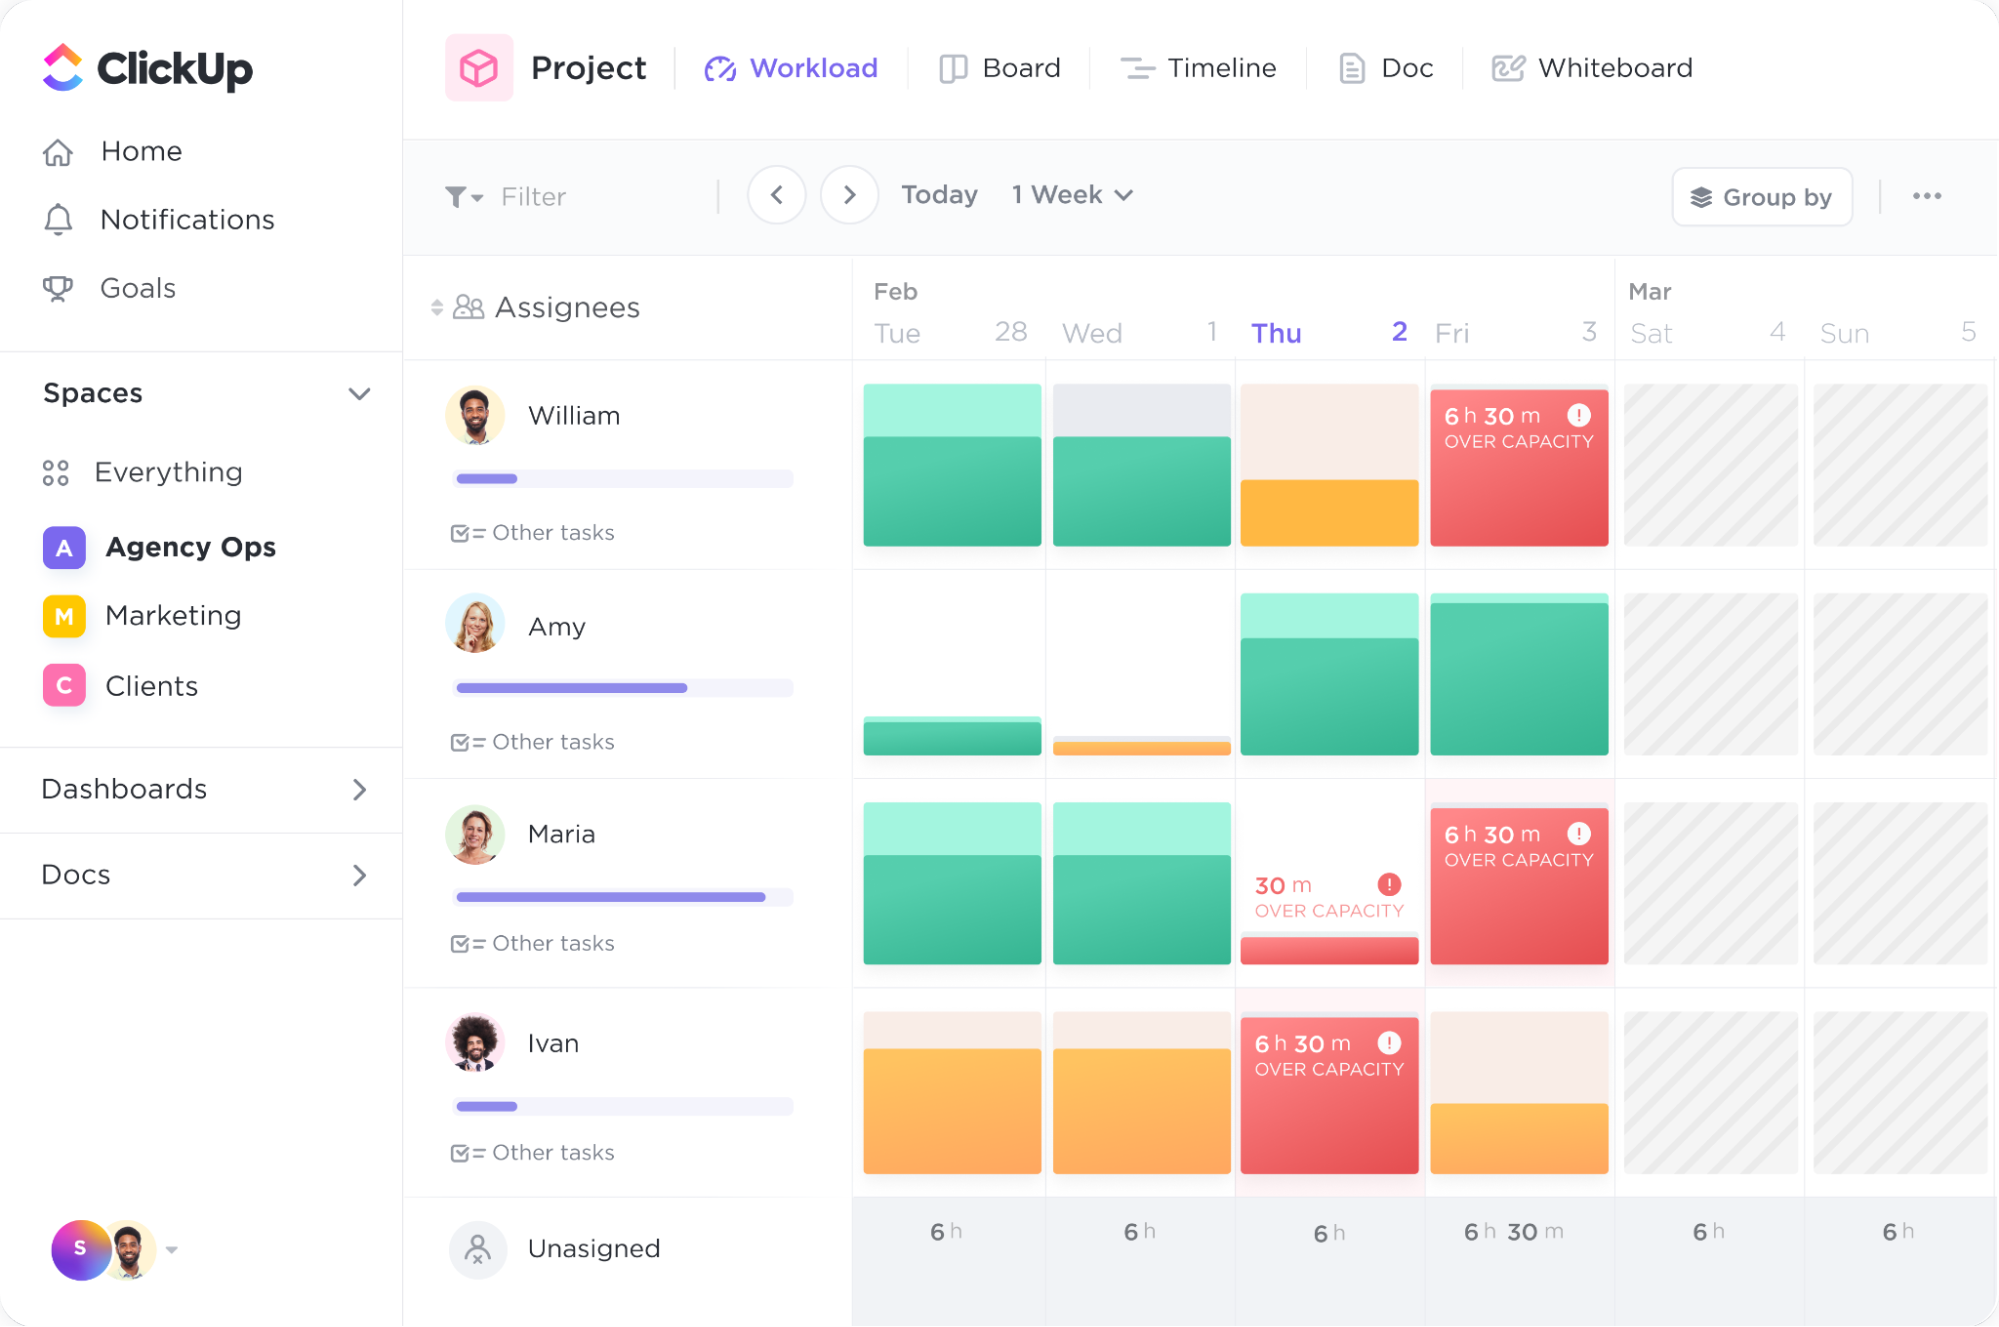 All three of these tools (and most alternatives) offer templates for managing creative projects.
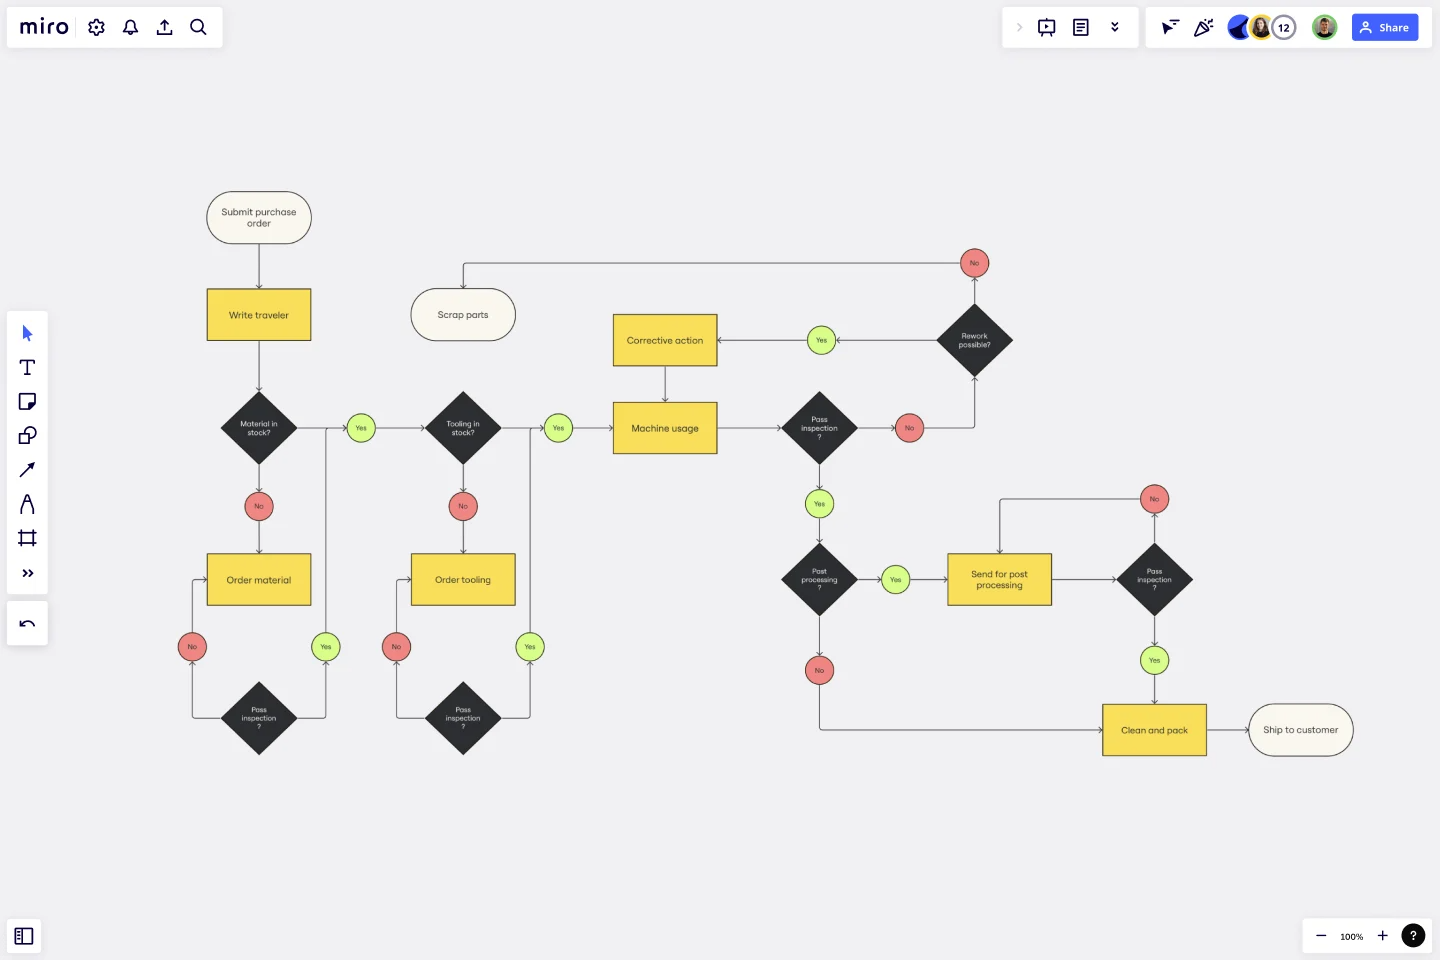
4. Map the Stages of Your Creative Workflow
Now we get to the heart of managing creative projects.
For this step, we'll be mapping out the stages of your workflow—from idea generation to final delivery. First, start by listing the different stages that your creative projects typically go through. This could include steps like:
Idea generation
Planning and research
Concept development
Creation and production
Review and approval
Delivery
Next, organize these stages into a clear and logical flow. If it helps, you can use a diagramming tool like Miro or Lucidchart to visually map out your workflow. This will help you get a better understanding of the overall process and identify any potential bottlenecks or areas for improvement.
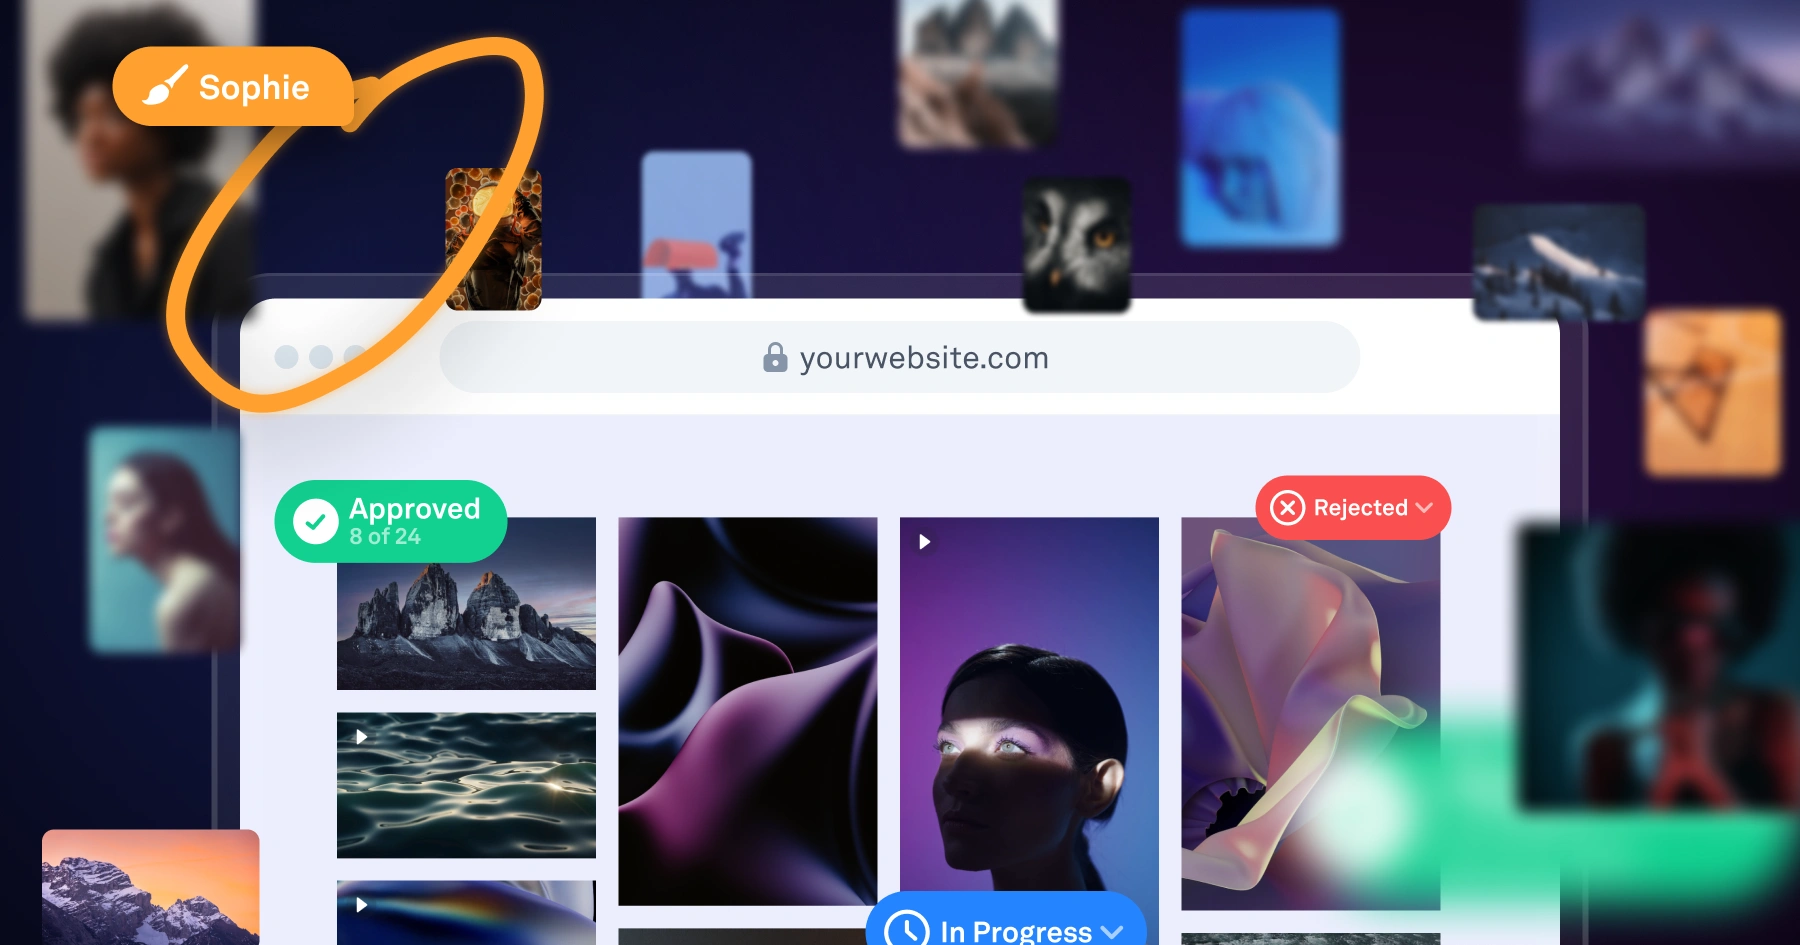
 Once you have your workflow mapped out, consider whether there are any specific tools or resources that could cut out wasteful steps or streamline the process. For example, if you often need to gather feedback from clients on visual content, Picflow could be a major help.
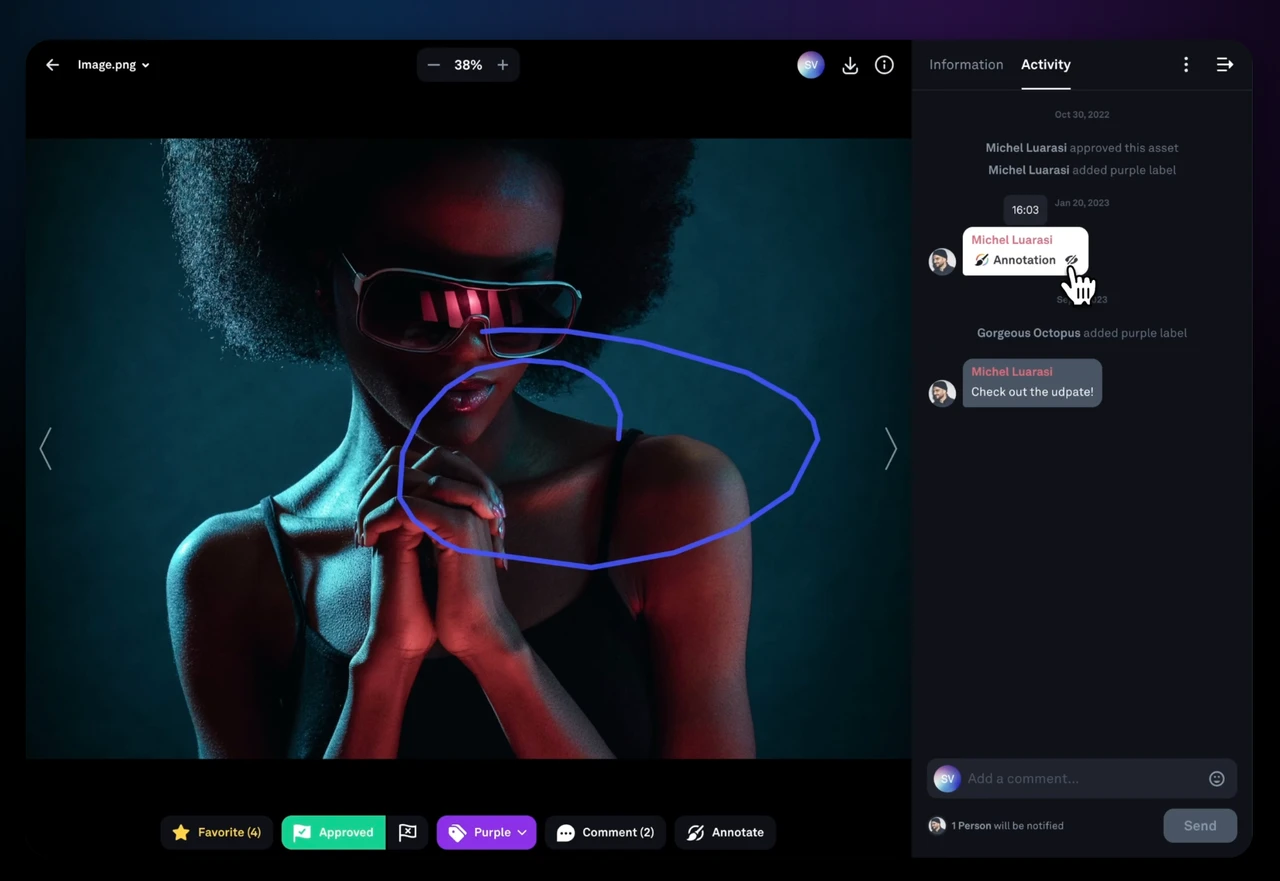
 Rather than complicating your workflow map with follow-ups, clarifications, and additional tools, Picflow lets you create stunning galleries that work for review, approval, and delivery thanks to features like:
Comments
Favorites
Approval lists and limits
Direct downloads
The result is a simpler creative workflow with fewer tools and more precise communication.
5. Have Your Team Sign Off on the Process
Next, make sure to involve your team members in developing your creative workflows. After all, they will be doing the work. You must ensure the process makes complete sense for them while helping and guiding them along, rather than getting in their way.
Once the process is final, get your team's sign-off before implementing it. Creative workflows are meant to be dynamic, so adjustments as your team gets used to a new workflow are normal.
Mapping out your creative workflow and getting approval from all your stakeholders is only half the battle. Once it is signed, sealed, and delivered, you must also consistently enforce it.
6. Identity Project Metrics
Next, you'll need to identify key metrics for your project. These will provide a measurable way to track the success of your creative workflow. Some common metrics used in creative projects include:
Time spent on each stage of the process
Number of revisions or edits needed
Client satisfaction ratings
Meeting project deadlines
By tracking these metrics, you can identify areas for improvement and make adjustments to optimize your workflow. It's also important to revisit and reassess these metrics regularly as your team grows and processes evolve.
7. Conduct Regular Check-in Meetings
A creative workflow is meant to be dynamic, and your structure may change as you obtain more information about your team's capabilities. Thus, it is important to conduct regular check-in meetings. These meetings will ensure people are focused, dedicated, and on track. They also provide valuable insights on bottlenecks that need to be addressed.
Building creative workflows introduces required structures and control over creative production, but don’t forget that they must also retain flexibility and responsiveness as the project's needs and goals evolve.
8. Automate When You Can
That brings us to the last step in building a high-performing creative workflow—automating whatever routine tasks you can.
This is an easy way to ensure that your workflow stays efficient and streamlined, as you can eliminate repetitive tasks and focus on the more important aspects of your work. Plus, the less time you spend on manual tasks, the more time you have to focus on creating high-quality content.
For Creative Ops and performance marketing teams managing campaigns across multiple formats, markets, and channels, repetitive production tasks quickly become a bottleneck. Resizing banners, localizing visuals, updating offers, or generating large volumes of design variations manually slows down campaign execution and limits the time available for creative strategy, audience segmentation, and performance optimization.
Ad creative automation platforms like Abyssale generate thousands of on-brand static, HTML5, video, and print PDF ad variations automatically from a branded template connected via API, spreadsheet, or native integrations like Zapier, Make, n8n, and Airtable. BackMarket reduced banner production time by 99% using this approach, from 9 days to under 20 minutes per campaign. The same model applies to e-commerce teams scaling product-level creatives, agencies managing multi-brand campaigns, and in-house teams localizing visuals across markets.
9. Review and Analyze the Project
Your work doesn’t end once the project is complete. After project completion, performing a thorough review is vital to see what went right, what didn’t, and how your team can improve in the future.
Among the key ingredients of a project review are specific productivity metrics. With these, you can see:
How long the approval and edits took
How many versions were created
How many approvals and decisions were required before project completion
The overall length of the project cycle in lieu of previous projects that are similar or related
By looking at these metrics, you can visualize if your review process for the recently completed project went faster or slower than before. You’ll also see if there were bottlenecks at certain stages of your project. If you do spot these in your review, take a look at the next step.
10. Calibrate Your Creative Workflow
At this stage, you already have a sustainable and inclusive creative workflow. But remember, these workflows are not static. Instead, they’re fluid. Implementing small and incremental improvements will optimize your creative tasks as bandwidth, workloads, and priorities change over time.
There are two significant drivers of change when fine-tuning your creative workflow.
They are:
Those that hinder your creative project to progress
Those that accelerate the progress
Benchmarks and KPIs can help you identify roadblocks in your creative projects and workflow. For example, let’s say you are keeping track of the number of versions for a project. If the KPI exceeds the benchmark number—perhaps significantly—ask yourself what adjustments you must make.
In that case, you can optimize the following:
The designer’s behavior: Are they too quick to develop a new version? Are they proceeding with your stakeholders' feedback?
The stakeholder’s behavior: Is their feedback unclear or lacking context? Is the feedback from various stakeholders dichotomous or out-of-sync, leading the designer to create just one version in a single direction and an entirely different one upon receiving new feedback?
Any of those metrics can indicate what adjustments you can make to your creative workflow.
Thus, holding check-in meetings is important to get feedback and understand the bottlenecks that might be popping up and that your KPIs do not show.
For example, during a check-in meeting with your chief marketing officer, they let you know they no longer have the capacity to have the final say on smaller creative projects and must delegate this to somebody else. Knowing this, you adjust your process, but your creative workflow gets affected.
So, during your next check-in meeting, consider separating the workflow based on the project and delegating that task to the demand generation team. At the same time, the head of content marketing becomes the arbiter of all things branding and social media.
Best Practices for a Great Creative Workflow
Find Tools for Each Stage of Your Workflow
Look for tools that can assist with each stage of your workflow—from ideation and creation to delivery. Or better yet, find a tool like Picflow that can handle multiple stages to save time and effort.
If you're exploring alternative options for managing and sharing creative assets, consider these top Brandfolder alternatives to find the best fit for your team.
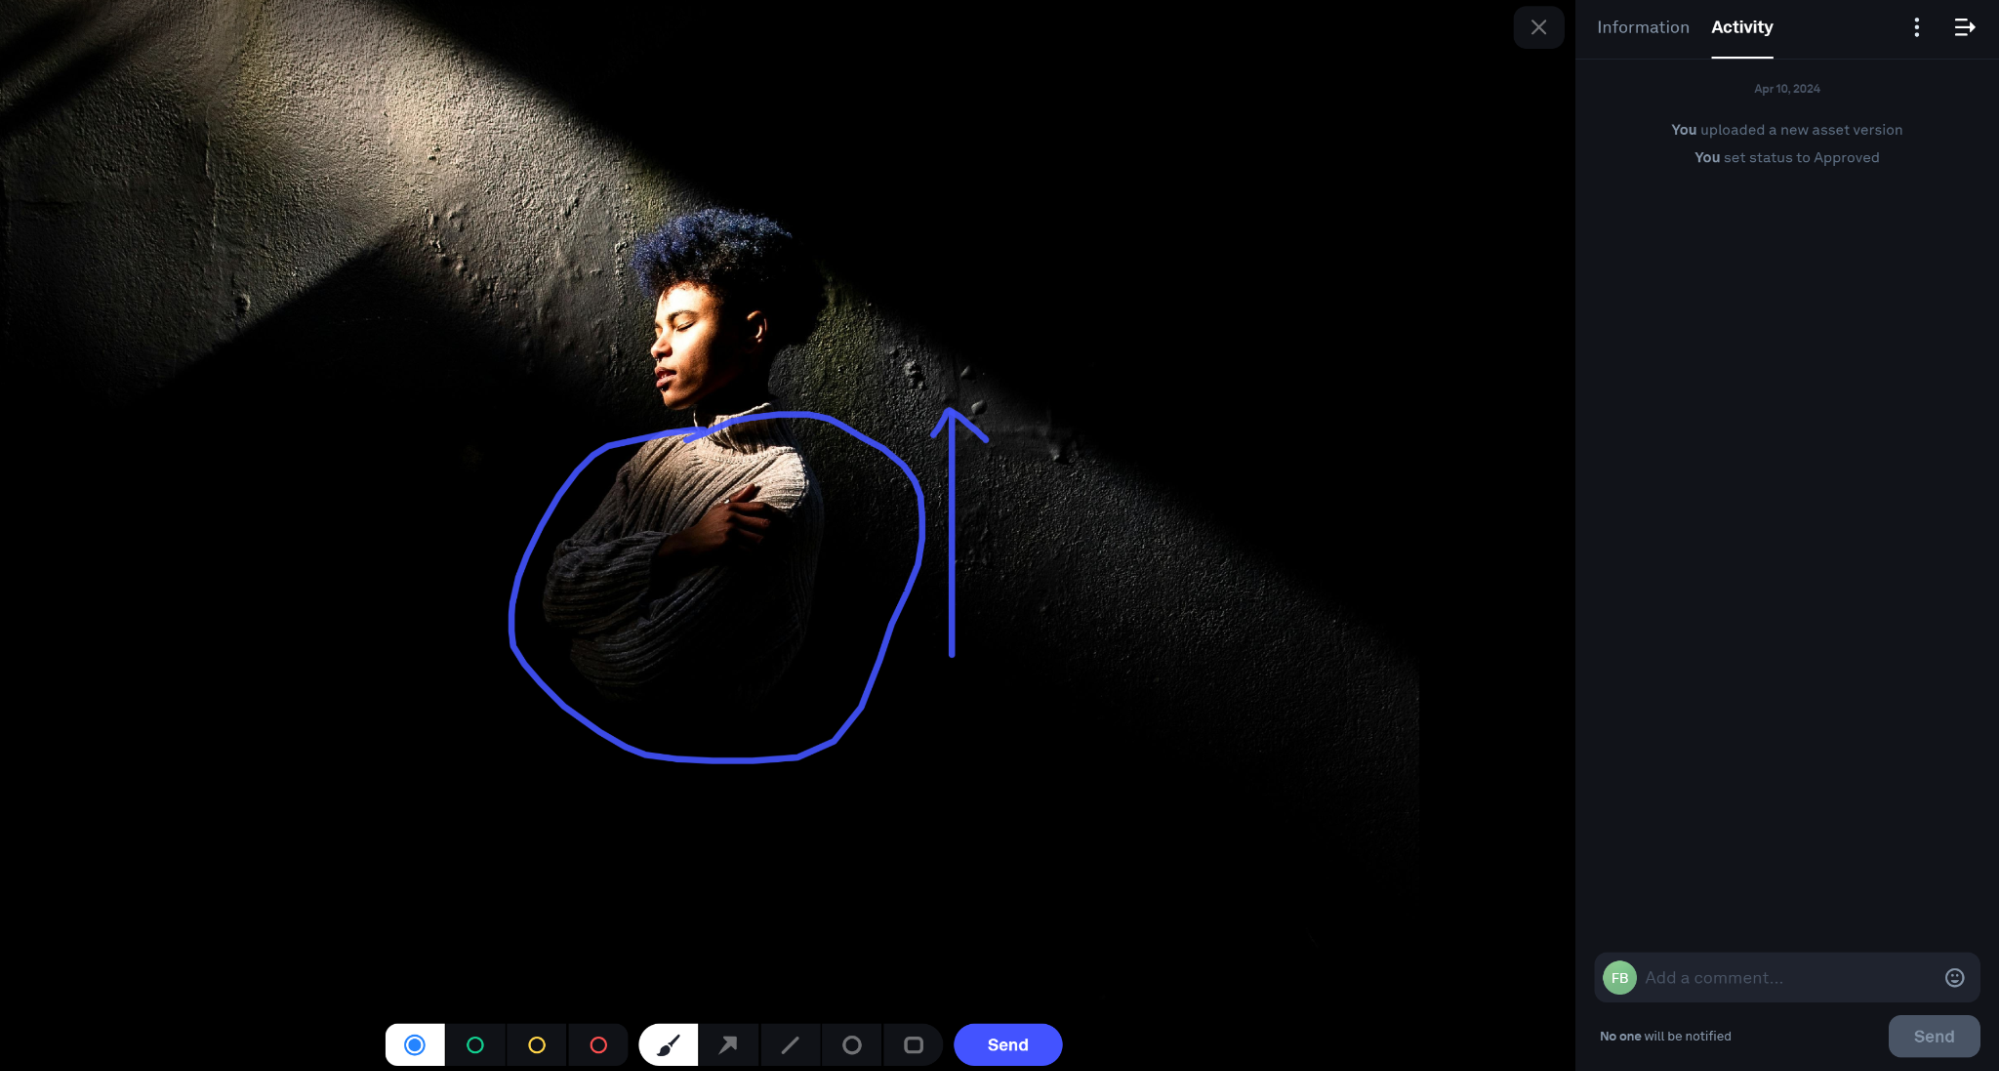
 At Picflow, we help creatives collaborate on visual content, manage client communication, and deliver stunning results—all in one platform. With features like annotations, version control, and shared galleries, you can easily keep track of your work and collaborate with others.
But Picflow isn’t the only tool out there. Here are some kinds of tools that can help at different stages:
Ideation: Diagramming tools (e.g., Miro), mind mapping tools (e.g., MindMeister), and note-taking tools (e.g., Evernote)
Creation: Graphic design software (e.g., Canva), video editing software (e.g., Adobe Premiere Pro), and writing tools (e.g., Grammarly)
Collaboration: Project management tools (e.g., Asana), online file-sharing services (e.g., Google Drive), and communication tools (e.g., Slack)
Create SOPs
SOPs (standard operating procedures) are your friend. They are step-by-step instructions for completing a task or process. Instead of reinventing the wheel every time, having SOPs will save you time and ensure consistency in your work. It also allows for easier onboarding of new team members.
Don’t want to create SOPs by hand?
 Use a tool like Loom to record yourself completing a task and explain the steps. Or use a tool like Scribe to outsource SOP creation to AI. This can save you even more time and ensure accuracy.
Build in Client-Centricity (or Stakeholder-Centricity)
Lastly, you’ll want to make sure you build client-centricity (or stakeholder-centricity) into your content creation process. Why? It’s one of the most important factors in creating successful and impactful content and is also one of the easiest to overlook.
You can do this by always considering your target audience or stakeholders when creating content. This means being diligent in understanding (and documenting) their needs, wants, and pain points. It also means choosing tools that clients and stakeholders are comfortable using.
Conclusion
Building a high-performing creative workflow is anchored on the delicate balance between structure and flexibility.
Establishing clear goals, allocating adequate time for ideation, and leveraging collaborative tools are foundational. Cultivating an environment that nurtures creativity, encourages team members to take risks, and embraces iteration is paramount.
Ensure a smoother creative workflow with Picflow. Our Client Gallery offers a user-friendly interface, real-time collaboration features, and powerful admin tools for creatives that prioritize efficiency, innovation, and client satisfaction.
Try Picflow for free today.